 Plugin Repo
This service supports your 3D printing workflow by providing auto-rotation and slicing functionality.
OctoPrint-PrePrintService
OctoPrint-PrePrintService is a powerful solution designed to enhance your 3D printing workflow by automating the orientation and slicing of your 3D models. This service leverages two cutting-edge tools:
For users of the Cura slicer, a similar toolchain can be set up using the OctoPrint Connection and Auto-Orientation plugins.
Workflow in OctoPrint
The workflow can be deployed on a single machine or across two separate nodes as demonstrated below:

The workflow consists of the following steps:
- Upload a model on OctoPrint and click on the
Slicebutton in thefile bar. - The model is auto-oriented for optimal 3D printing by Tweaker-3 software.
- The oriented model is then sliced by Slic3r.
- The final machine code is sent back to the OctoPrint server.
- You can start your print
Each step can be customized by adjusting the settings as described in the documentation.
Demo-Video
Requirements
- One server node that is connected to your 3D printer, like a Raspberry Pi.
- One server node for pre-processing, which has at least 2GHz CPU frequency. If the node connected to the printer is strong enough, one server suffices.
- Optional: Install Docker version 1.10.0+ and Docker Compose version 1.6.0+ on the more powerful node.
Setup
1. Set up the PrePrintSerivce in Docker
For high availability, it is recommended to deploy the PrePrint-Service in Docker.
Make sure to select the appropriate CPU architecture of the server node in the argument SLIC3R_VERSION for the installation of Slic3r in docker-compose.yml, see here.
To run the application locally, use:
git clone https://github.com/christophschranz/OctoPrint-PrePrintService --recurse-submodules
cd OctoPrint-PrePrintService
docker-compose up --build -d
docker-compose logs -f
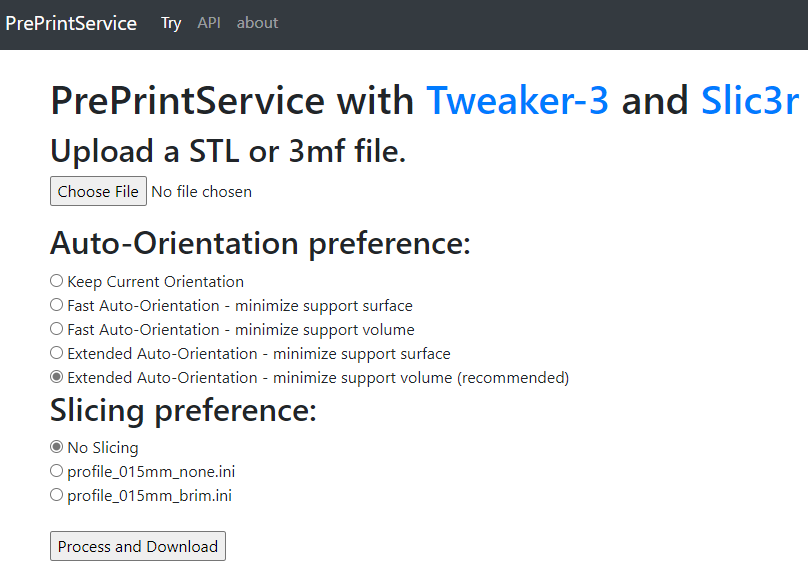
The service is available at localhost:2304/tweak (on the server node), where a simple UI and API documentation are provided for testing the PrePrint Service. Use docker-compose down to stop the service.
2. Install the PrePrintService Plugin
Install the PrePrintService Plugin using the Plugin Manager (under Get More with the name PrePrintService Plugin
or manually using the URL on the Printer-Controller
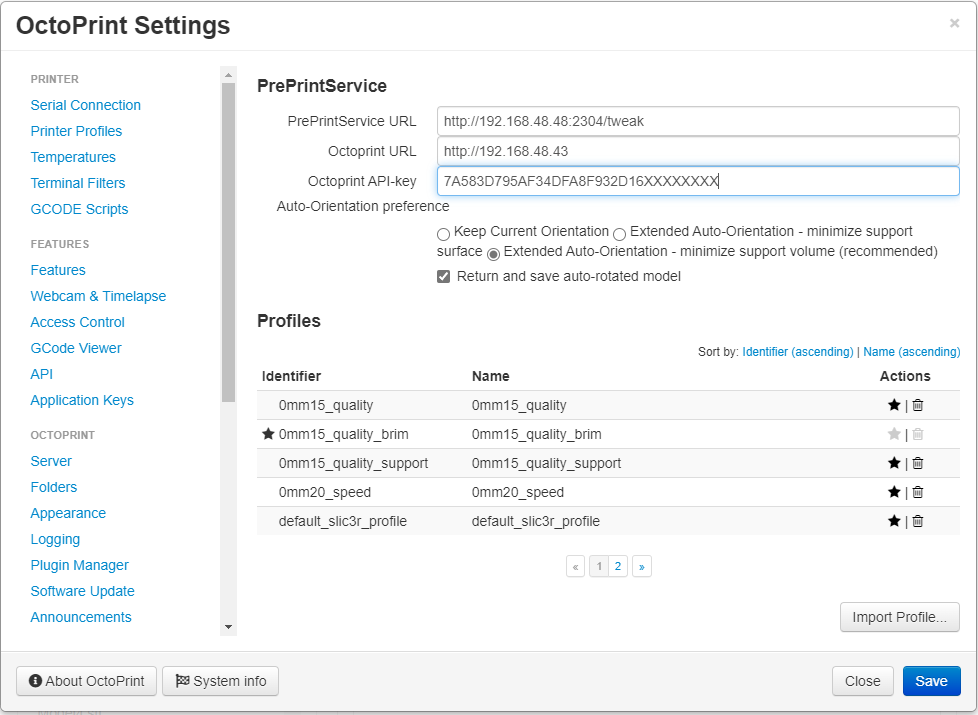
Configure the plugin in the OctoPrint settings, ensuring that the URL for the PrePrint service (docker) is set correctly.
Make also sure to use the correct URL of the Octoprint server and copy and paste the Octoprint API-key that can be found under settings, API.
Save and return to the OctoPrint home UI, click the Slice button on uploaded STL models, and generate printable machine code using this Preprocessing-Plugin. If the small slicing button of the STL files loaded (right of the trash symbol) is deactivated, Octoprint can’t reach the PrePrintService.
3. (optional) Install Plugins to visualize models
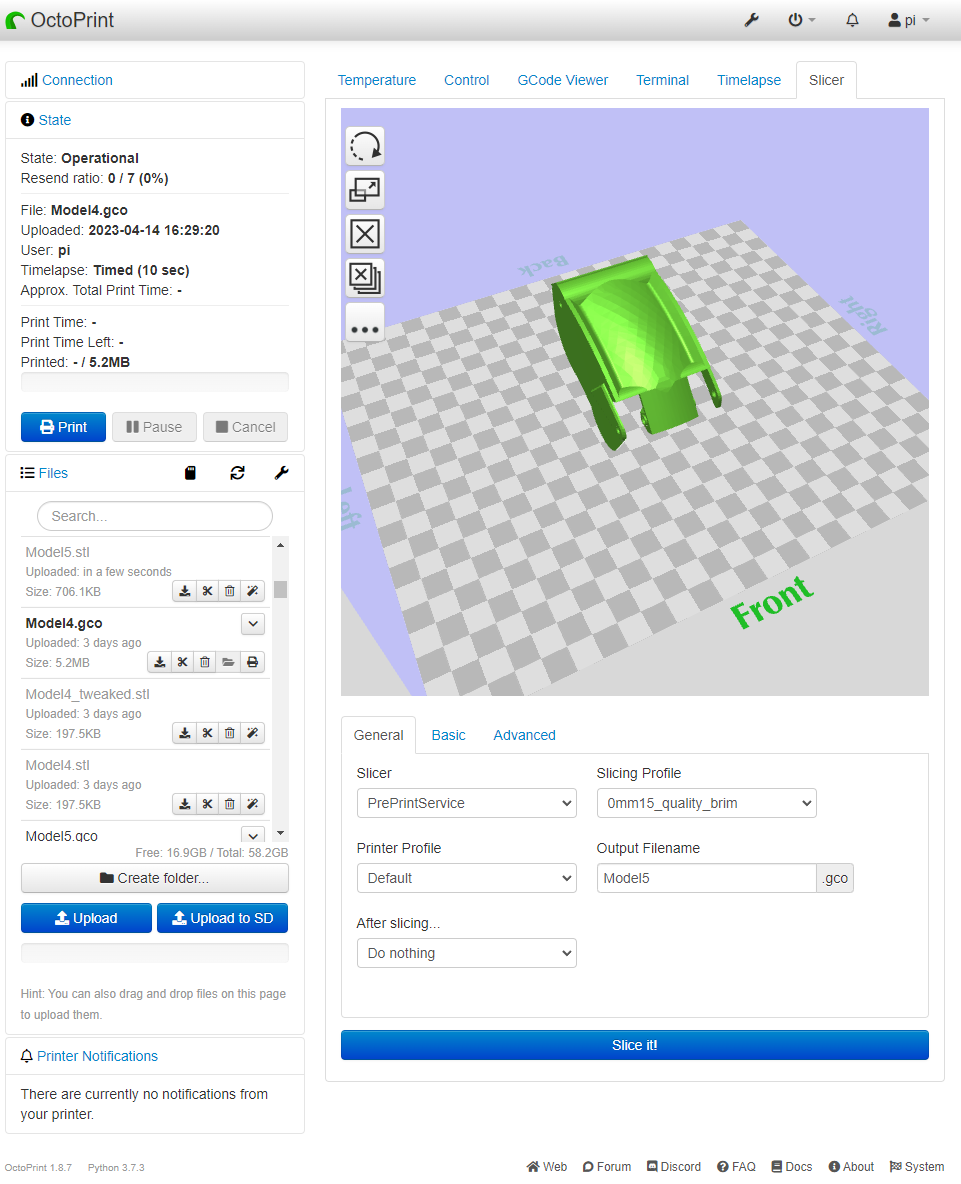
Plugins to visualize STL models and GCode improve the workflow. Therefore install the GCode Viewer() and Slicer(https://github.com/kennethjiang/OctoPrint-Slicer).
As soon as installed and reloaded, the new Slicer-Tab can be used to load STL-files via the model’s slice-button and
sent to the PrePrintService with a Slicing Profile and Output Filename.
Testing
To test the entire setup, follow these steps:
-
Check if the docker service runs appropriately without errors:
docker-compose logs -f -
Visit localhost:2304/tweak, select an STL model file and perform an extended Tweak (auto-rotation) without slicing. The output should be an auto-rotated (binary) STL model. If not, check the Docker service logs using
docker-compose logs -fin the directory wheredocker-compose.ymlis located. -
Repeat the process with slicing enabled. The resulting file should be a G-code file of the model. If not, check the Docker service logs using
docker-compose logs -fin the same folder. -
Visit the OctoPrint server, click the
Slice-Button for the uploaded STL model in the file bar, and generate printable machine code using this PrePrint-Service Plugin. After a few seconds, a.gcofile should be uploaded. If this doesn’t work, start the OctoPrint server using the commandoctoprint serveand monitor the logs withtail -f .octoprint/logs/octoprint.log. The following two lines are expected:2019-04-07 22:28:44,301 - octoprint.plugins.preprintservice - INFO - Connection to PrePrintService on http://192.168.48.81:2304/tweak is ready, status code 200If the the PrePrint Server can’t be reached, you will see this:
2019-04-07 22:27:34,746 - octoprint.plugins.preprintservice - WARNING - Connection to PrePrint Server on http://192.168.48.81:2304/tweak couldn't be establishedMake also sure that your selected
profilefile is correct. An invalid profile would look result in:2020-02-05 21:20:28,777 - octoprint.plugins.preprintservice - ERROR - Got http error code 500 on request http://192.168.48.48:2304/tweak 2020-02-05 21:20:28,778 - octoprint.plugins.preprintservice - INFO - Couldn't post to http://192.168.48.48:2304/tweak
If you encounter any issues setting up this plugin or have suggestions for improving these instructions, please let us know!
PrePrint-Service API
You can use the API to preprocess your models for 3D printing. The documentation is available when the server is running at http://localhost:2304/api/. To interact with the API in Python, follow the example below:
import requests

url = "http://localhost:2304/tweak"
model_path = 'preprintservice_src/uploads/model.stl'
profile_path = 'preprintservice_src/profiles/profile_015mm_brim.profile'
output_path = 'gcode_name.gcode'

# Auto-rotate file without slicing
r = requests.post(url, files={'model': open(model_path, 'rb')},
                  data={"tweak_actions": "tweak"})

# Only slice the model to a gcode
r = requests.post(url, files={'model': open(model_path, 'rb'),
                              'profile': open(profile_path, 'rb')},
                data={"machinecode_name": output_path,
                        "tweak_actions": "slice"})

# Auto-rotate and slice the model file
r = requests.post(url, files={'model': open(model_path, 'rb'), 'profile': open(profile_path, 'rb')},
                  data={"machinecode_name": output_path, "tweak_actions": "tweak slice"})
print(r.status_code)
return_object = r.text
The resulting object, either a tweaked STL file or a G-code file, is accessible via r.text, which may be several MB in size.
Information on interacting with OctoPrint’s API is available here. You can test the file upload API using the following example:
import json
import requests

# OctoPrint's URL using the default port 5000 and the API including the API-key
url = "http://192.168.48.43:5000/api/files/local?apikey=A943AB47727A461XXXXXXXXXXXX"
model_path = 'preprintservice_src/uploads/model.stl'

# Upload a file using OctoPrint's API
r = requests.post(url=url, files={'file': open(model_path, 'rb')})
print(r.status_code)
print(json.dumps(r.json(), indent=2))
Common issues
docker-composereturns an error about unsupported CPU, e.g.:ERROR: for pre-print-service Cannot create container for service pre-print-service: NanoCPUs can not be set, as your kernel does not support CPU CFS scheduler or the cgroup is not mounted ERROR: Encountered errors while bringing up the project.The reason could be that the container trys to install Slic3r for the wrong CPU architecture. Select an appropriate
SLIC3R_VERSIONin theargsfield indocker-compose.yml, i.e.,x64for most servers andarmv7lfor a Raspberry Pi.
Note of the developer
I hope this PrePrintService improves your 3D printing workflow!
When using in academic works please cite:
Schranz, C. (2016). Tweaker - Auto Rotation Module for FDM 3D Printing. https://doi.org/10.13140/RG.2.2.27593.36966
This plugin, as well as the auto-rotation module Tweaker-3 was developed in my spare time. If you like it, I would be thankful about a cup of coffee :)
![]()
Happy Printing!