 Plugin Repo
Plugin to control two servos attached to a camera gimbal to control motion.
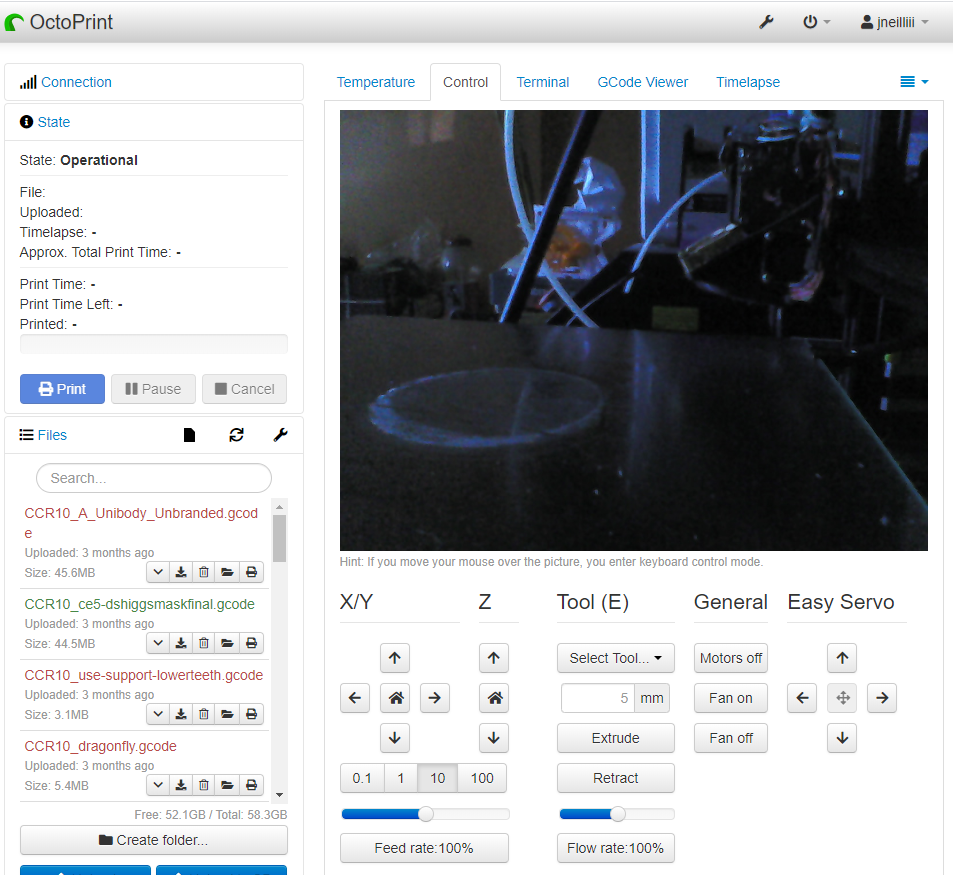
Easy Servo
Here is a growing plugin you can use to easily control multiple servo motors using the octoprint interface. It has been programmed in conjuction with a camera gimbal mount design iFrostizz published on Thingiverse here.
It utilizes the SimpleApiPlugin from Octoprint in order to send commands to the GPIO pins.
Example: EASYSERVO_REL 12 10 will move the servo attached to GPIO number 12 10 degrees in the positive direction from the current position. EASYSERVO_REL 13 -10 will move the servo attached to GPIO number 13 10 degrees in the negative direction from the current position.
Note: The servos will initialize at 90 degrees on OctoPrint start up and is limited to a 90 degree rotation in either direction. A later update will support continous servos (you can do the mod yourself).
Pre-Installation Requirements
Pigpio installation
Please follow the steps below in order for this plugin to properly operate. Without these steps the plugin will not be able to control the assigned GPIO numbers on your Pi and as a result the servos will not move.
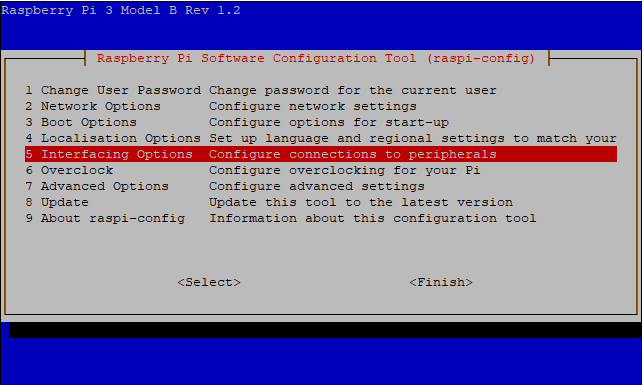
- SSH to the pi and run the following command.
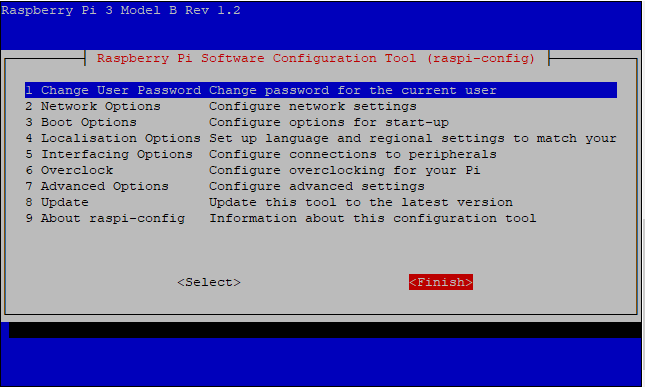
sudo raspi-config
Select Interface Options
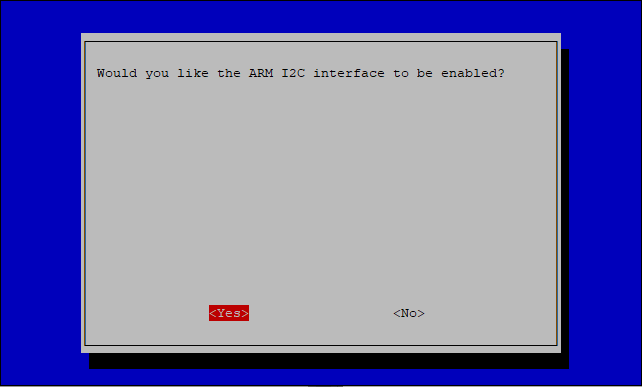
Select I2C

Select Yes to enable the ARM I2C interface
Press Ok
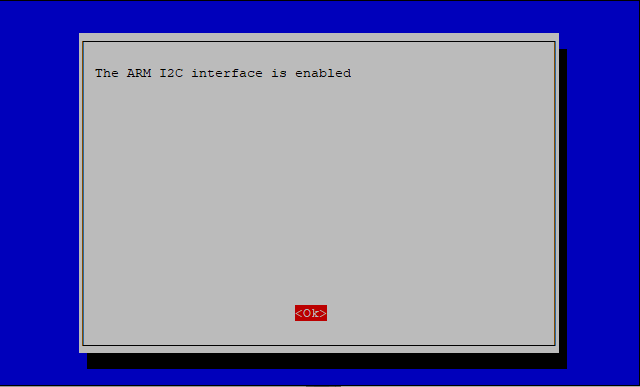
Select Finish to exit raspi-config.
- Now run the following commands to install and configure the required pigpio daemon.
sudo apt-get install pigpiod
sudo nano /lib/systemd/system/pigpiod.service
This will open a text editor. Change the ExecStart line to be /usr/bin/pigpiod -x -1 like the screenshot below in order to enable write access to all GPIO pins. You can adjust this command to fit your specific needs or to limit write capabilities to only the GPIO pins you are using. The plugin uses the default GPIO pins 12 for the X Axis and 13 for the Y axis. Check the pigpiod site for possible comand-line options and the Raspberry Pi Foundation site for additional GPIO information.
Note: the last character at the end of the example line above is the number one.
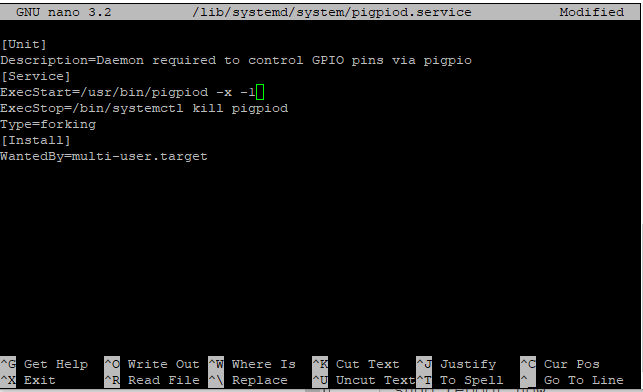
Press CTRL+X to exit, Press Y to save, Press enter to keep the original name.
- Now run the following commands.
sudo systemctl enable pigpiod
sudo service pigpiod start
sudo shutdown
Your pi will shutdown and you are now ready to connect your servos.
Warning: Make sure you Pi has enough time to cleanly shutdown and then unplug the power supply before continuing.
Pimoroni installation
Since the 0.2.2, the EasyServo plugin also support the Pimoroni library. This library can be installed by following the steps described here: https://github.com/pimoroni/pantilt-hat/blob/master/README.md You will need this library if you are using the Pan-Tilt hat from Pimoroni.
Wiring
Connect the 5V and GND wires of your servos (recommended exernal power source) followed by the signal wires to the two GPIO numbers that you want to control with the plugin. The below diagram schows the servos connected to GPIO numbers 12 and 13 (the default plugin’s GPIO number assignments) on a Pi 3B+.
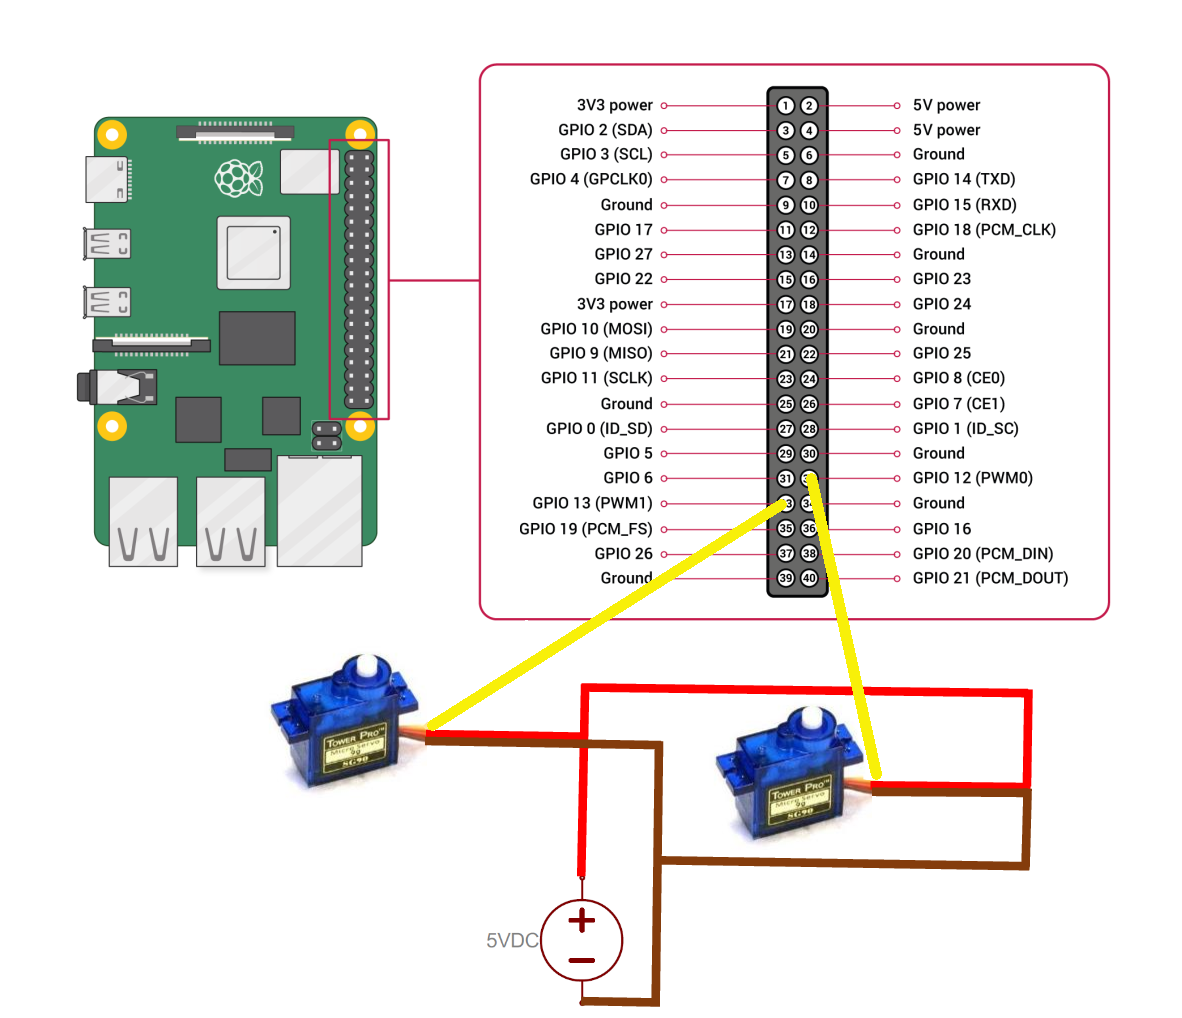
Use the chart below to identify the GPIO numbers to use in the plugin’s settings after install if you choose anything other than 12 or 13 as diagrammed above. The GPIO numbers in yellow are the ones that can be controlled by this plugin.
Grounding the external power supply may be a solution if your servos are doing anything strange!

You are now ready to continue with the plugin install/configuration.
Install
Install via the bundled Plugin Manager or manually using this URL:
https://github.com/iFrostizz/OctoPrint-EasyServo/archive/master.zip
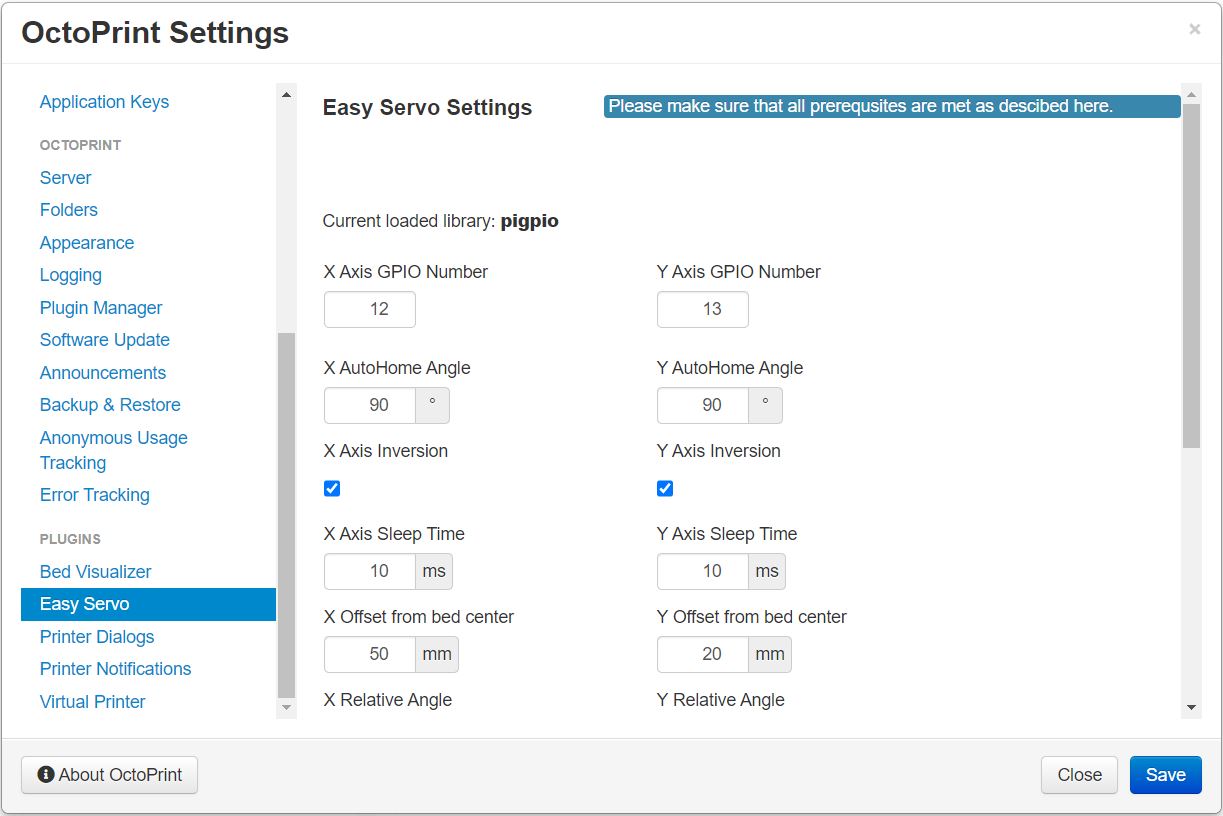
Settings
The plugin supports the ability to configure the GPIO numbers used for controlling the servos for the X and Y axes.

Features
Basic control
You can either control the servos from the Octoprint interface or using the M118 command. This can be useful if you need a servo movement in a specific moment of your print job. Note that the servo movement is not blocking (your print head will not wait for the servo movement to finish in order to execute the next gcode command). You should then set some “Dwell Time” using the G4 command https://marlinfw.org/docs/gcode/G004.html if you need so. Here is the syntax of the M118 commands:
- M118 EASYSERVO_REL
example: M118 EASYSERVO_REL 12 10 will move the servo attached to the GPIO 12 at a relative angle of 10°. - M118 EASYSERVO_ABS
example: M118 EASYSERVO_ABS 13 79 will move the servo attached to the GPIO 13 at the absolute angle of 79°. Note that the range is 0-180°. - M118 EASYSERVOAUTOHOME
( ) example: M118 EASYSERVOAUTOHOME 13 12 will set both servos at their autohome angle. It is working the same way as an absolute positioning command. Note that you don't need to home both axis at the same time.
Also, a “Relative Angle” has been added in the settings. This will modify the relative angle amount in order to make bigger or smaller movements between each use of the arrows.
Z-Tracking
This new feature will track the Z position of your printer in real time when the button is locked. It will only work in absolute positioning and will update each time a movement command comporting a “Z” is performed.
Before trying this feature, you have to enter the x and y offsets in the settings to let the plugin compute the angle.
The xOffset correspond to the horizontal length in mm between the axis of the servo and the point that you want to track (let’s say the center of the print bed)
The yOffset correspond to the vertical length in mm between the eye of the camera when this last one is at 90° and this same point.
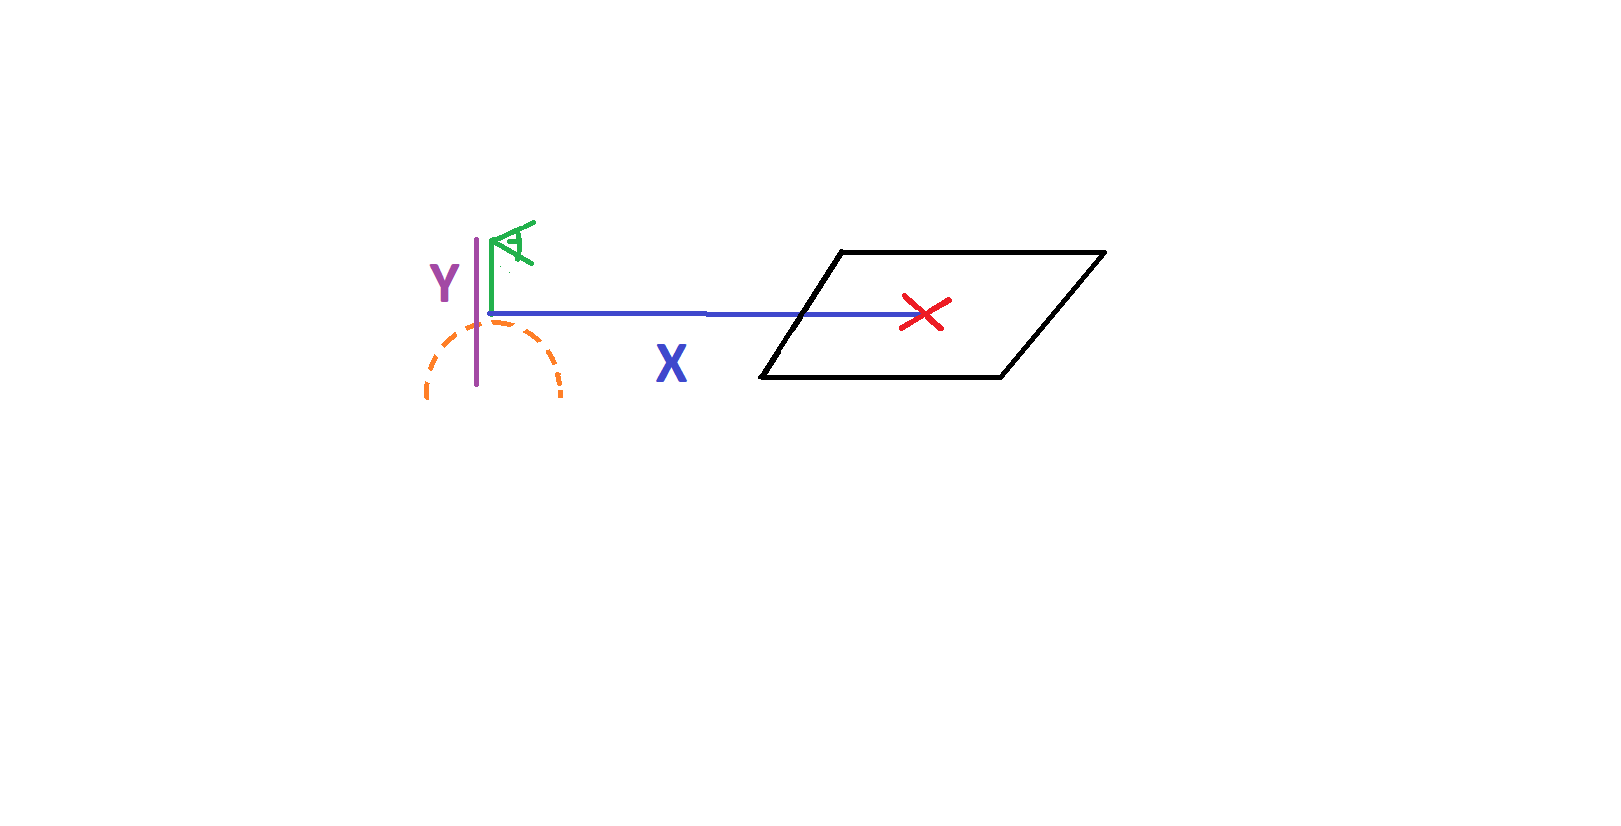
Black: Print bed
Red: Target point
Green: Camera
Orange: Servo range (Here, the camera is at 90°)
Custom point
Now, you will be able to move until a point you want to save in just one click. Take for example the position of your servos when you see your spool ?
- Move until you see the spool
- Hit the button “Get Current Position” in the settings in order to get the X and Y position of your servos
- Edit your custom point just above while naming it, and setting the angle read.
- The custom point should appear in the control tab and should lead to your wonderful spool after clicking on it.
Disclaimer
Although the Authors use this plugin without issues, You take resposiblity for any damage caused by using this plugin or connecting servos to your own Pi. Please make sure to do your reseach and understand the dangers and please be careful. It’s recomended to power servos externally to prevent performance issues on your pi and make sure all your minimum and maximum angle boundaries are set correctly.