Plugin Repo
This allows you to send a webhook to any URL when events happen on OctoPrint.
NOTE: this plugin has been abandoned by the original creator and adopted here by a new maintainer
For now, the below is preserved as the former README (except for a change to the setup URL)
OctoPrint-Webhooks
This allows you to send a webhook (a.k.a. API Request) to any URL when certain events happen on OctoPrint such as when a print starts, finishes, fails, …
This plugin supports snapshot photos, OAuth, custom HTTP Methods (GET, POST, PUT, DELETE), custom headers, custom data and data format, custom encoding (json vs. x-www-form-urlencoded), and much more. It is very advanced and can send almost any kind of request to your server when an OctoPrint action occurs.
Blog Post
I wrote a blog post to explain more about what this plugin is and why I built it. Blog Post
Setup
Install via the bundled Plugin Manager or manually using this URL:
https://github.com/derekantrican/OctoPrint-Webhooks/archive/master.zip
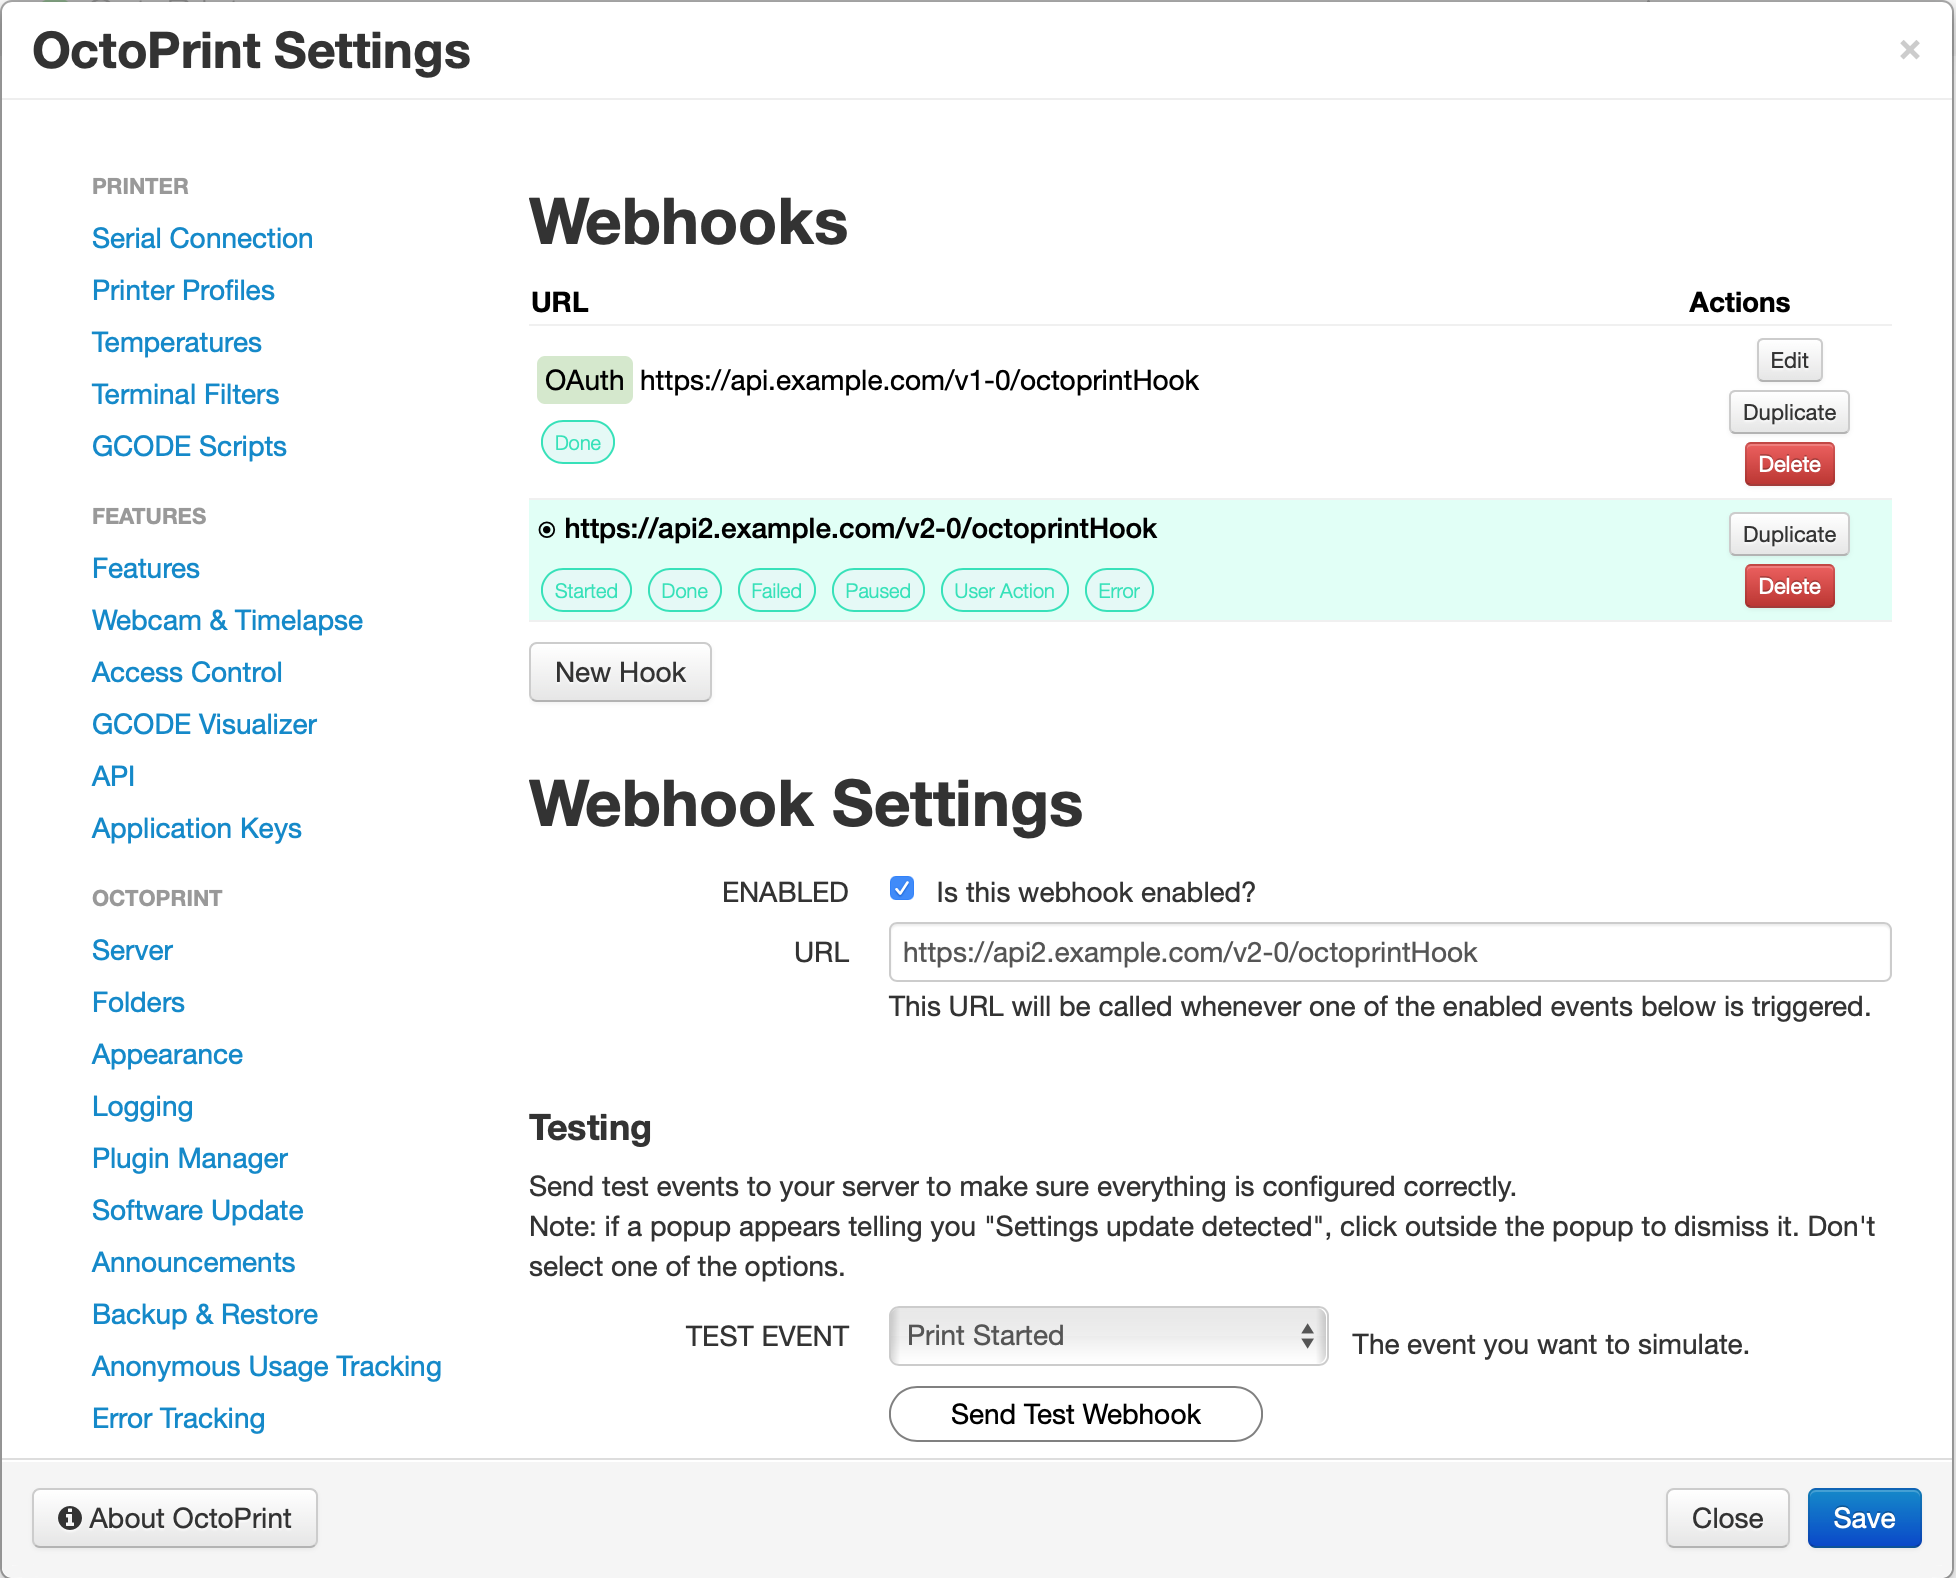
Once you’ve installed the plugin, go to the settings page for this plugin. The page is called “Webhooks”. Select which events will trigger a webhook, then change the following:
URL
The url that will be called when an event occurs such as https://www.myapi.com/v1/method
HTTP METHOD
The type of HTTP request to make… Usually this is POST.
CONTENT TYPE
This determines how the data is encoded before it is sent to your server. Usually, JSON will work, but on some older systems x-www-form-urlencoded might be needed.
NOTE: The proper HTTP header will be set for ‘Content-Type’ if you don’t supply one that allows the data to be sent properly. For instance, if you set the Content Type setting to JSON, then ‘application/json’ must appear somewhere your ‘Content-Type’ header. If ‘application/json’ does not appear in your ‘Content-Type’ header or is set to some other value, it will get replaced. So, you could set it to ‘application/json charset=utf8;’ if you wanted to, but not ‘application/yoyo’ as that would get replaced to ‘application/json’.
API SECRET
This field is optional. If you want to provide a secret key/password that you can check on the server this is the easiest way to do that. For instance, if you set the API Secret to ‘abcdef123456’, then on your server you can check to make sure the API Secret is ‘abcdef123456’. If it is not, then the request came from something other than your OctoPrint Server and you should ignore the request (Somebody is trying to hack you!). Also, for security reasons you should set this to some long random string instead of something like ‘password’.
DEVICE IDENTIFIER
A name or id that you can provide to your printer to distinguish printers from each other. You can use this service with multiple printers using the same settings. Just set this device identifier to something different and you’ll be able to detect which printer sent the event.
Webhook Request
By default, the webhook will be called with the following data:
{
  "deviceIdentifier": "the DEVICE IDENTIFIER in settings",
  "apiSecret": "the API SECRET in settings",
  "topic": "the name of the event - see below for events",
  "message": "a description of the event - can be used for display purposes",
  "extra": {...} //a json object of data related to the event - different for each event
}
To change the format of the request, there are some advanced configuration parameters you can modify.
Advanced Configuration
Headers
Provide a JSON dictionary of HTTP headers that will be passed along with the request such as:
{
  "Content-Type": "application/json"
}
Data
Provide a JSON dictionary of parameters that will be passed along with the request such as:
{
  "deviceIdentifier":"@deviceIdentifier",
  "apiSecret":"@apiSecret",
  "topic":"@topic",
  "message":"@message",
  "extra":"@extra",
  "custom1":"my custom data",
  "custom2":"my second piece of custom data",
  "print_name":"@job.file.name",
  "estimated_print_time":"@job.estimatedPrintTime"
}
You can use @param syntax to insert variables into the JSON for both the Headers and Data. For instance, if above you set ‘DEVICE IDENTIFIER’ to “Blane’s Printer”, then @deviceIdentifer will get replaced with “Blane’s Printer” when the webhook request is made.
You can also use dot notation to grab only parts of a dictionary. For instance, if there was a param named @job that contained the following:
{
  "file": {
    "name": "myFile.gcode", //the name of your file
    "path": "/myFile.gcode",
    ...
  }
}
Then, you could use the notation @job.file.name to just retrieve the file’s name instead of the entire dictionary.
You can also use multiple @param variables in the same string. For instance:
{
  "custom1": "@param1 some text here @param2 - @param3"
}
Just make sure to put a space after each @param.
See below for the list of available variables that you can use with the @param syntax.
Available Variables
@deviceIdentifier - the user set DEVICE IDENTIFIER found in settings
@apiSecret - the user set API SECRET found in settings
@topic - the type of event that was triggered. See below for a list of topics/events.
@message - a short description of the type of event that was triggered.
@extra - a dictionary of extra data that was passed along by OctoPrint. This dictionary depends on the event, but is usually something like the following:
{
  "origin": "local",
  "name": "myFile.gcode",
  "user": "myUserName",
  "owner": "owner of the file",
  "path": "/someFolder/myFile.gcode",
  "size": 10890569
}
See this link for the data that is passed with each event.
@state - a dictionary of data showing the current state of the printer
{
  "text": "Operational",
  "flags": {
    "operational": true,
    "printing": false,
    "cancelling": false,
    "pausing": false,
    "resuming": false,
    "finishing": false,
    "closedOrError": false,
    "error": false,
    "paused": false,
    "ready": true,
    "sdReady": true
  }
}
See this link for more information.
@job - a dictionary of data about the current print job
{
  "file": {
    "name": "DarwinKeycap.gcode",
    "path": "DarwinKeycap.gcode",
    "display": "DarwinKeycap.gcode",
    "origin": "local",
    "size": 242038,
    "date": 1588195405
  },
  "estimatedPrintTime": 476.05552375713864,
  "averagePrintTime": 48.8202253183409,
  "lastPrintTime": 31.290278981000007,
  "filament": {
    "tool0": {
      "volume": 0.8077585001602579,
      "length": 335.8269600000015
    }
  },
  "user": "iAmLegend"
}
See this link for more information.
@progress - a dictionary of data about the current print job’s progress
{
  "completion": 14.496484023169915, //percent complete
  "filepos": 35087, //the current byte position in the file being printed
  "printTime": 29, //seconds already spent printing
  "printTimeLeft": 40, //seconds remaining
  "printTimeLeftOrigin": "average" //how the time remaining was calculated.
}
See this link for more information.
@currentZ - the current z height of the print head in mm.
@offsets - any print offsets if applicable … otherwise an empty dictionary.
@meta - a dictionary of metadata for the file you are printing.
{
  "statistics": {
    "averagePrintTime": {
      "_default": 49.04197595574509
    },
    "lastPrintTime": {
      "_default": 50.53992706
    }
  },
  "hash": "2d2f2c6a410f8786b62604422799c9f3c0721367",
  "analysis": {
    "estimatedPrintTime": 476.05552375713864,
    "printingArea": {
      "maxZ": 5.6,
      "maxX": 136.67,
      "maxY": 116.672,
      "minX": 0.0,
      "minY": -3.0,
      "minZ": 0.0
    },
    "dimensions": {
      "width": 136.67,
      "depth": 119.672,
      "height": 5.6
    },
    "filament": {
      "tool0": {
        "volume": 0.8077585001602579,
        "length": 335.8269600000015
      }
    }
  },
  "history": [
    {
      "timestamp": 1588195498.7716029,
      "printTime": 50.352958230999995,
      "printerProfile": "_default",
      "success": True
    },
    ...
  ]
}
@currentTime - The time of the event in number of seconds since the epoch. The epoch is usually January 1 1970, 00:00:00 (UTC).
@percentCompleteMilestone - The last percent complete milestone. Usually this is used with the Print Progress event for the message text.
@snapshot - This is a special parameter that can only be used on the first level of a dictionary. For instance, you can use it like this:
{
  "snap": "@snapshot"
}
but not like this:
{
  "snap": {
    "image": "@snapshot"
  }
}
The @snapshot parameter will be replaced with a jpeg image if a snapshot can be retrieved from your connected webcam. Make sure under FEATURES -> Webcam & Timelapse -> the ‘Snapshot URL’ is set and working. This is what is used to grab a snapshot. The snapshot is then resized so that it can be quickly transported, and then sent along with your webhook under the key name you provided to the @snapshot parameter. If for some reason an image can’t be taken or there is an image processing issue, then the @snapshot parameter’s key will be deleted and removed from the request. So, it is recommended that you make the image parameter optional on your server.
NOTE: If you use the @snapshot parameter, the data will automatically be encoding using multipart/form-data and will override your settings and headers to match.
NOTE: In some cases the data might not be available. For instance @meta.statistics.lastPrintTime might not exist. If this happens, the @param will be replaced with an empty string.
Strategy - Getting all data
You can copy and paste the following in the DATA box to get all the available data. Then, you can remove and rearrange things as necessary.
{
  "deviceIdentifier":"@deviceIdentifier",
  "apiSecret":"@apiSecret",
  "topic":"@topic",
  "message":"@message",
  "extra":"@extra",
  "state": "@state",
  "job": "@job",
  "progress": "@progress",
  "currentZ": "@currentZ",
  "offsets": "@offsets",
  "meta": "@meta",
  "currentTime": "@currentTime",
  "snapshot": "@snapshot"
}
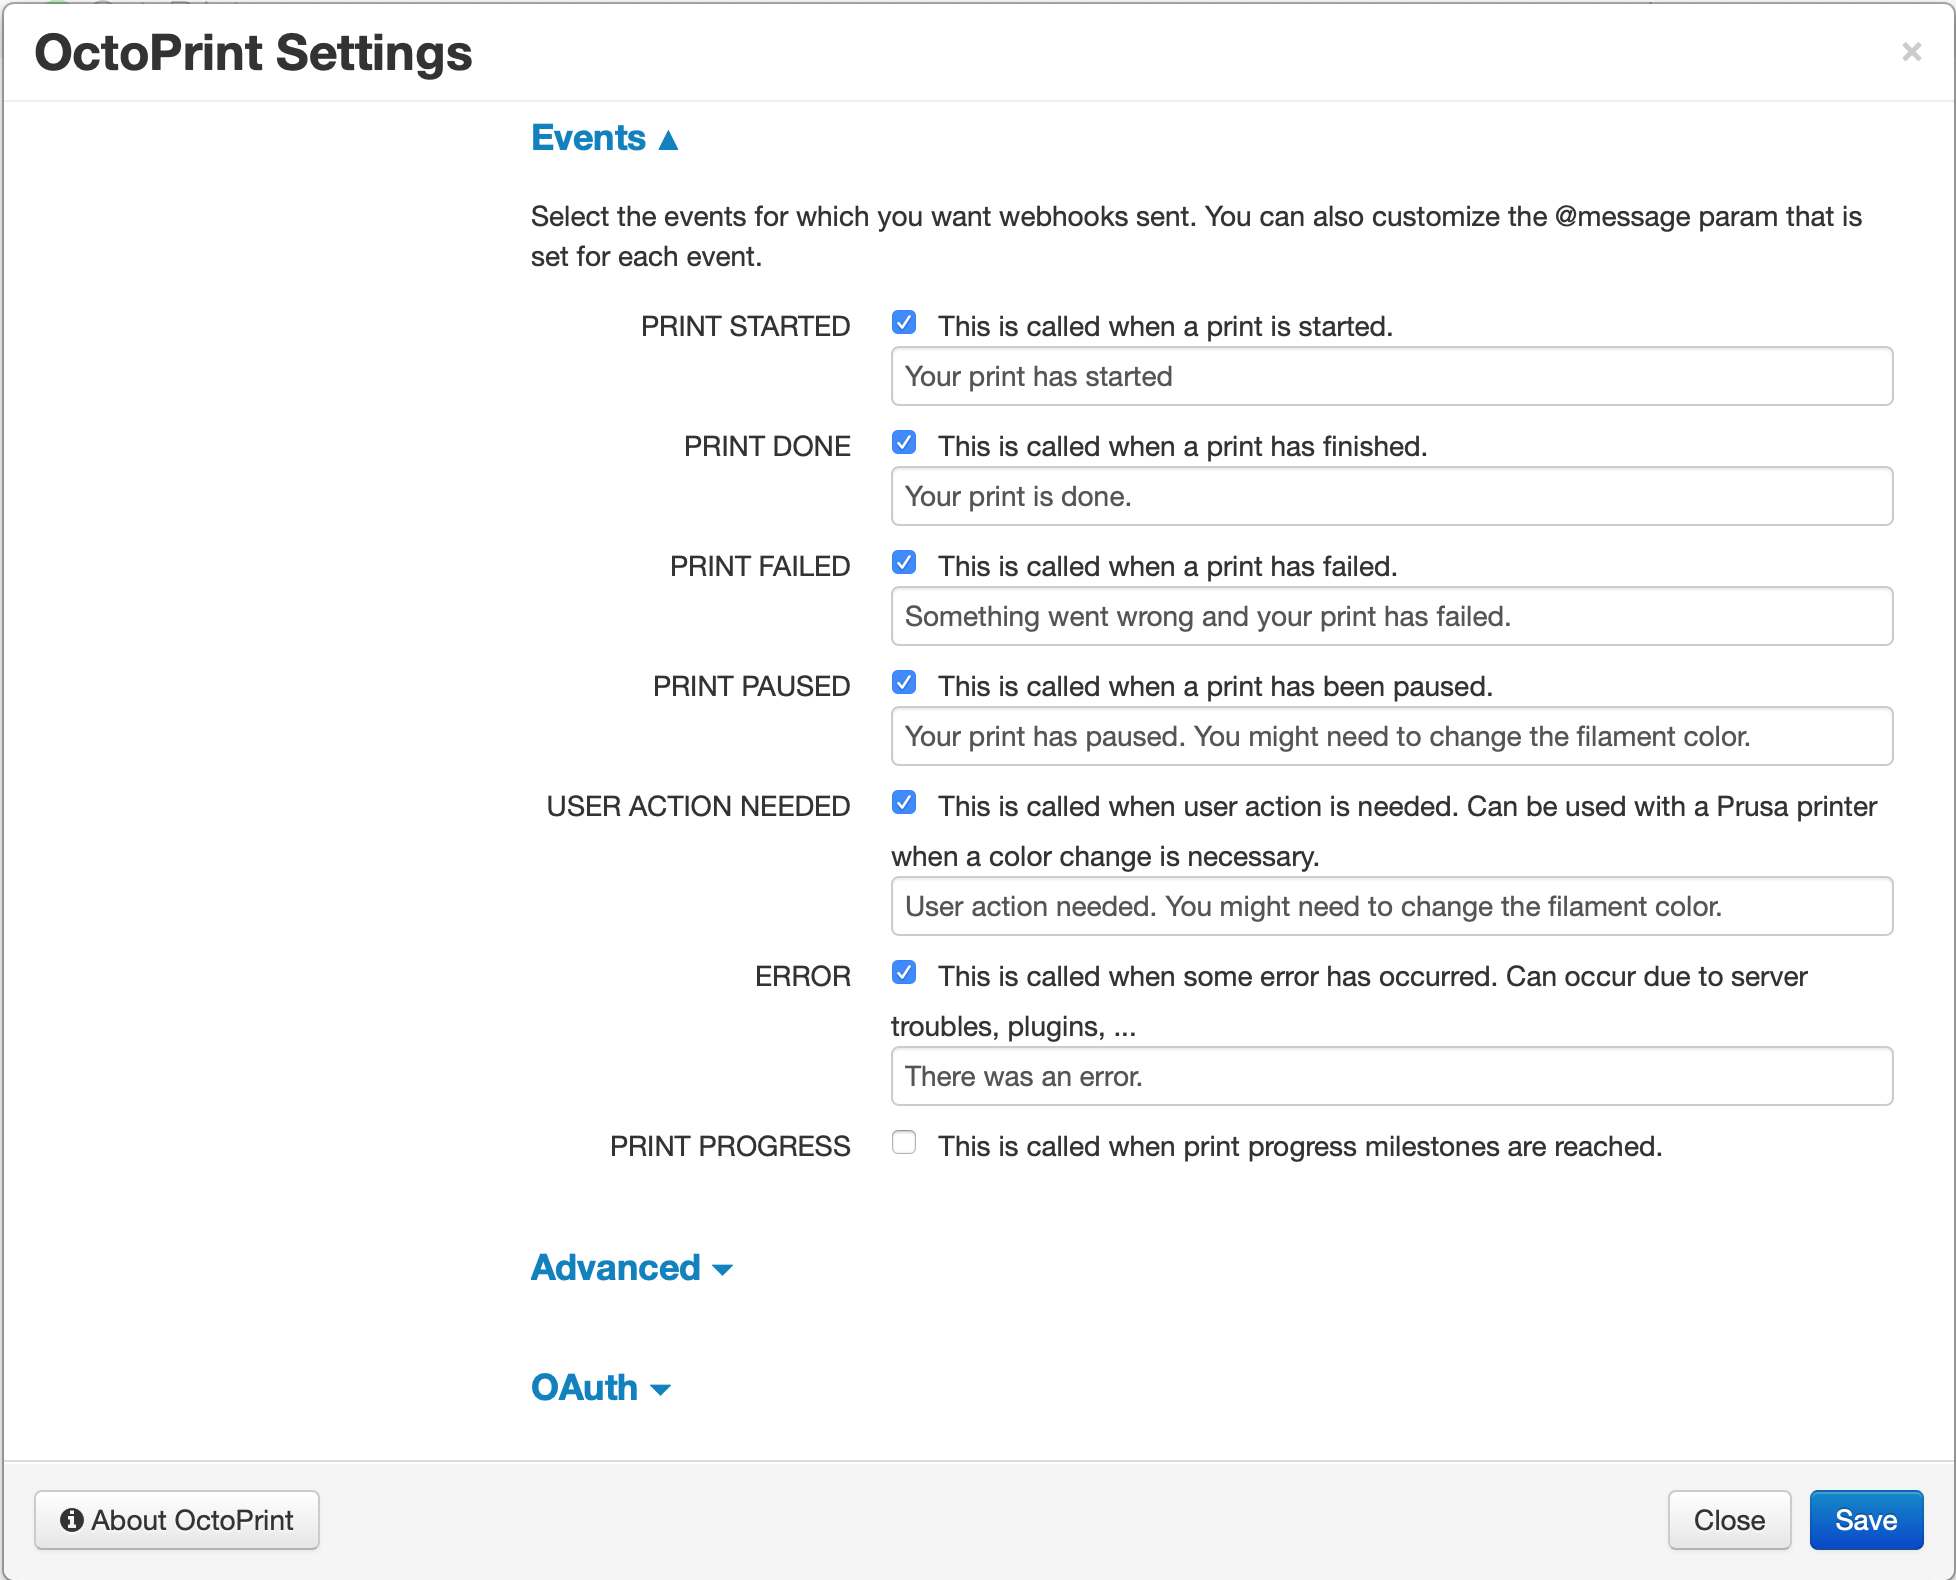
Events / Topics
The following is the list of topics that can trigger a webhook.
- Print Started
The print has started.
- Print Done
The print has finished.
- Print Failed
The print has failed.
- Print Paused
The print has been paused.
- User Action Needed
Called on Prusa Printers when a color change is necessary.
- Error
An error has occurred. Can refer to many different types of errors.
- Print Progress
Sends progress reports every ‘x’ percent where ‘x’ is defined by you. For instance, you can send a progress webhook every 10%, 25%, or 7% if you wanted. For instance, if you set ‘x’ to 5, then you would get a notification at 5%, 10%, 15%, 20%, …, 95%.
NOTE: 0% and 100% are not triggered by this event, use ‘Print Started’ and ‘Print Done’ for those events.
Event Data
For details on what ‘extra’ data is provided with each event, check out the following. https://docs.octoprint.org/en/master/events/index.html#printing
OAuth
OAuth is a common authentication mechanism used by many APIs. If your server requires you to first make an API call trading credentials for tokens so that you can use those tokens in your API request, then OAuth should be enabled. You can then access the properties of the OAuth response using something like @access_token in the DATA and HEADER settings for your webhook request.
Once you’ve ticked the box to enable OAuth, you’ll see some fields that you need to fill out such as the url to call, the HTTP Method, Content-Type, Headers, and Data. These work similar to the webhook settings, except you cannot use the @param sytax.
When an event triggers a webhook, this OAuth request will be called first (if enabled). The response is expected to be JSON and will be parsed. All the keys in the JSON dictionary will be available as @params that will be passed into the webhook request. For instance, if the reponse of the OAuth request was
{
  "access_token": "abc123",
  "refresh_token": "efg456",
  "expires_in": 3600
}
then you could use @access_token, @refresh_token, and @expires_in inside the ‘DATA’ and ‘HEADERS’ Advanced Settings to pass them into your webhook request.
TESTING
At the bottom of the settings page, you can simulate events to test out your API and make sure everything is working. Just choose the event type and click the ‘Send Test Webhook’ button. You’ll see a popup message (usually in the top left of the screen) showing you the result of the webhook and if there were any errors. You’ll be notified if there are any JSON parsing issues with the settings you provided or any networking issues etc. The API requests that are sent are expected to return HTTP status codes between 200 and 399. Anything outside of that range will be considered an error.
NOTE: If you see a popup telling you that settings need to be reloaded - ignore this. Don’t select an option, instead click outside the box on the screen. You can get into a weird state where you change the settings and they aren’t being updated. If this happens just refresh the page and try again.
Pictures